Face searching is harder than you might think because both the photo and the tool you use need to follow certain (unwritten) rules.
So, how do you make the most out of that photo you want to reverse search? This is how to get the best results possible! ⬇️
| Face Search Steps | What to Do | |
| 1. HD photo | Upload a clear, non-blurry, unfiltered image | |
| 2. Full face | No glasses, masks, or hair covering features | |
| 3. Pick a tool | Use tools made for face recognition | |
| 4. Angles | Choose a straight-on, centered photo (ID-style) | |
| 5. Natural light | Well-lit photo with no harsh shadows | |
| 6. Solo photos | Crop out other people and distractions |
1. The Photo Has to Be HD
Face lookup tools work best with somewhat HD photos so that the facial features are easily distinguishable.
Face searching works through facial analysis, so low-quality images can trigger inaccurate results or simply make the tool return 0 matches.
– What qualifies as a high-quality face image?
The photo isn’t grainy or pixelated, and the face has no blur to it. No extreme beauty filters are present.
Tip: If a low-quality picture of a face is all you have, use photo-editing apps like Meitu to improve the quality before uploading.
2. Make Sure the Face Is Fully Visible

The image you upload has to have a face that’s fully visible, and you can make out each and every single feature.
- 🪮 Hair/bangs aren’t covering the face (forehead) too much
- 👓 The person isn’t wearing glasses
- 💄 No heavy makeup is being used
- 🧔🏻 The facial hair doesn’t take up too much space
- 🧣 Scarves, hats, and other items don’t hide the face itself
- 🐱 No masks or virtual stickers are blocking the face
Basically, if you can see every facial feature (forehead, eyebrows, eyes, nose, lips, etc.), then the tool you use will likely recognize the face in the photo.
Important: Choose a recent photo of a person for better results in case they underwent significant change (naturally or through surgery).
3. Choose an Adequate Face-Search Tool
For optimal results, use tools built for face searching that can identify faces with high accuracy.
ProFaceFinder is a top example. It scans billions of online records for image sources: social media, dating apps, news articles, and more.
Some search engines, like Google and Yandex, have built-in image search features you can use to verify faces for free, but they’re not as effective.
– Are free or paid tools better?
Paid services are more reliable due to face recognition technology. Free tools work best with popular faces and visually similar matches.
⚠️ Tip: Always go for a reputable service; read customer reviews on TrustPilot to know if it’s effective and trustworthy. Compare results on multiple tools.
4. Pay Attention to the Face Angle
The person needs to be looking straight into the camera so that the reverse-search tool can correctly read the face in its natural state.
❌ Avoid side profiles, chin shots, or photos where the person is looking up, down, left, or right. Full-body pictures are unnecessary, too.
The results will be better if the person is centered and zoomed in (think of an ID photo), but you should be good as long as the face isn’t too far away.
If one photo doesn’t work, try multiple. Experiment with angles until you hit the sweet spot and trigger face-search results!
5. Natural Lighting Works Best for Face Searches
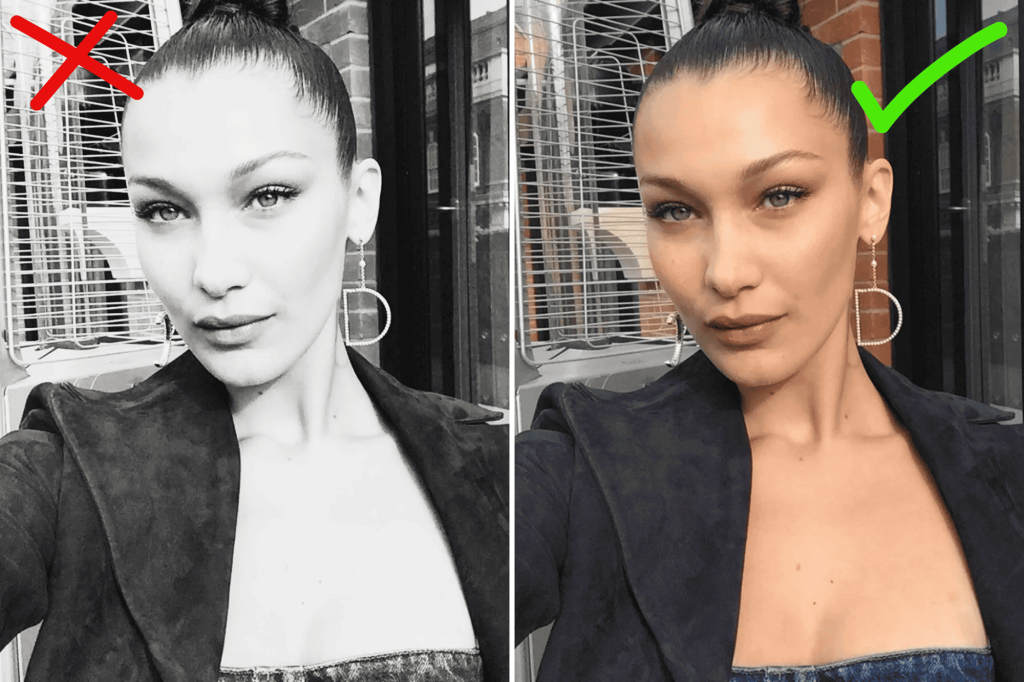
Choose a photo with natural lighting. It needs to be well-lit, with no shadows on the face – no black-and-white photos!
The values of the face image need to be balanced: brightness, exposure, saturation, shadows, contrast, and so on, for maximum performance.
Are the facial elements defined, with their natural shadows and curves maintained? If so, feel free to reverse search the photo!
6. Use Solo Photos Only
So, reverse face search engines work by focusing on one singular face and finding matches that appear on online sites.
This is why they perform best with solo photos, and not group shots with multiple people present.
✂️ How to crop photos so that the face is the main focus?
First, get rid of background distractions: people, objects, buildings, signs, etc., because some reverse photo lookup tools may accidentally focus on them.
The face has to be in the middle and not too far away – if cropping degrades the photo’s quality, enhance it using third-party apps as explained above.
Note: Use Incognito Mode to prevent face-search tools from personalizing results based on your search history.
Which Features Improve Face-Search Performance?
Look for face lookup tools that focus on face recognition and have multiple useful functions to help organise the results.
- AI Detection: Since AI-generated and AI-edited photos are very common nowadays, go for a tool that can detect artificial content, like ProFaceFinder.
- Flexible Prices: Ideally, you want a service like SmallSEOTools that offers both monthly subscriptions and individual photo lookups.
- Search Filters: Many multipurpose tools offer to find similar or exact results on faces, objects, or locations in photos. LensoAI does this.
- Device Compatibility. TinEye, for instance, is a reverse-search engine that’s compatible on desktop, phone, and as a browser extension.
- Anonymity: Always opt for services that enable private reverse face lookups and real-time alerts.
‼️ If you’re reverse searching faces for serious matters, like identifying catfishes or finding mugshots, go for powerful photo search engines like ProFaceFinder or PimEyes.
Otherwise, search engines and free tools work perfectly fine for shopping or verifying celebrities’ identities!
Leave a Reply